by Thomas Kurz
Do these tests to determine if you have the potential to do front splits, side splits or straddle splits, and back bridges, even before you start my strength and flexibility program.
Front Split Test
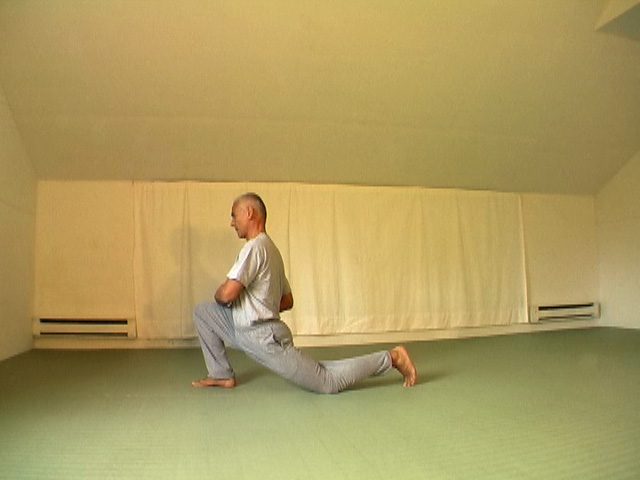
Front split test–front lunge
Stand in a deep lunge. If your thighs are nearly in one line, as they should be in a front split, it means your hip joints and their ligaments do not prevent you from doing the front split. Only tightness of your muscles may keep you from sitting in a flat front split with both legs straight. With my method you will relax, or even elongate, these muscles and be able to do the front split with no warm-up.
Side Split Tests
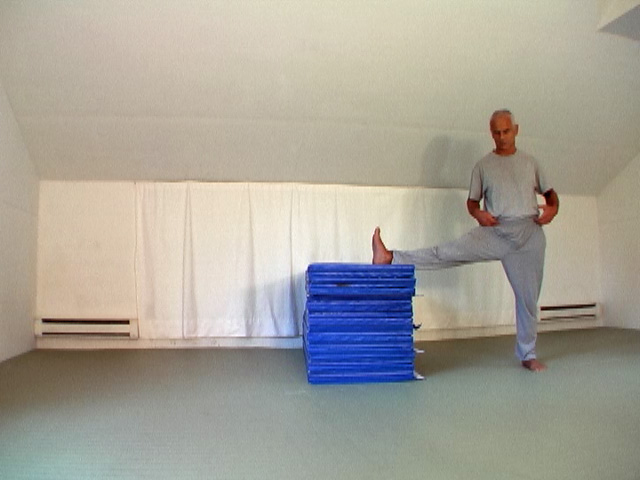
Side split test–thigh abduction with external rotation
If you think the length of your muscles and structure of your hips will not let you do side splits, try this test . . . The leg resting on the support is in the position it would maintain in a split.
Make sure both your hips and your raised leg are all in one line and your pelvis is level. Repeat this test with your other leg.
Now, what have you done? You have done “half side splits” with both your legs! You have proved to yourself that both your hip joints have all the range of motion needed for a full side split! You have also proved that the muscles of each of your legs are already long enough for the side split. You know that no muscle or ligament runs from one inner thigh to the other (or, if you don’t know it, you can ask your doctor). So, what keeps you from doing the whole side split with both legs spread sideways at the same time? Nothing that this program can’t remedy. Yes, if you follow this exercise program, you will be able to do side splits any time, without any warm-up!
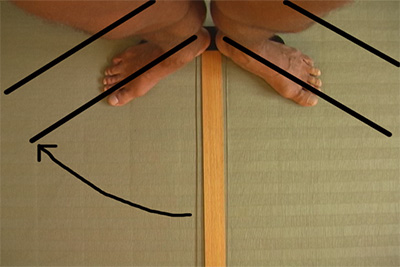
Turnout as a test of potential to do a side split
One more test of the potential to do a side split–it is not as comprehensive as the preceding test, but it is informative nonetheless.
The amount of outside rotation of the femur in the hip decides the quality of your side split. This rotation is limited by the length of the ligaments of your hip joints, by the muscles that rotate the thigh inside, and in a few cases by the configuration of the thigh bones.
It is measured as an angle between the center line and the direction in which your kneecap is pointing–and the foot should be pointing in the same direction as the kneecap.
So, the above photo shows my maximal external rotation and this is enough for side splits. If you have greater external rotation, good for you. If you have a little bit less of this rotation, it is likely you can still do splits. If you have a much smaller angle of external rotation, then it is not likely you can do splits.
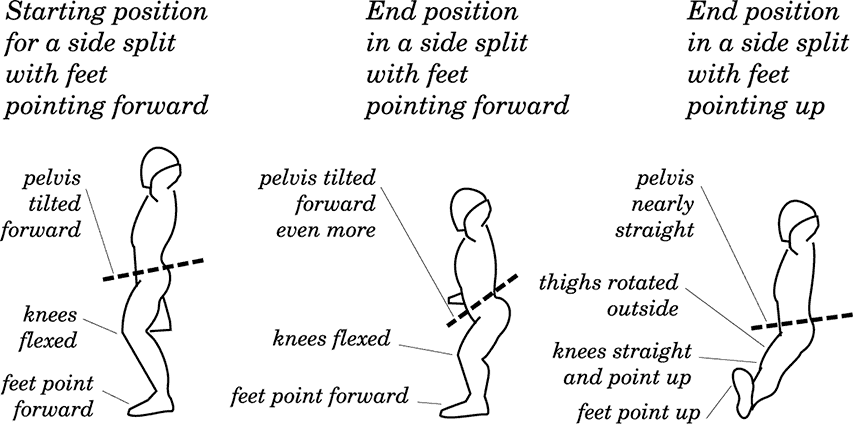
Side split: pelvis tilted forward or thighs rotated outward
Note that in doing a side split you not only spread your legs sideways but also tilt your pelvis forward and rotate your thighs outward.
In a side split with the feet pointing forward, you tilt your pelvis strongly forward, and your thighs rotate outward as they are spread apart.
In a side split with the feet pointing up, you tilt your pelvis a little but rotate the thighs maximally outward.
The alignment of the hips and thighs in both types of the side split is the same. You cannot do this split without some combination of rotating your thighs outward and tilting your pelvis forward. Spreading the legs without these additional movements twists and tightens the ligaments of the hip and jams the tops of the necks of your thigh bones against the cartilage collar at the upper edge of your hip socket.
Back Bridge Tests
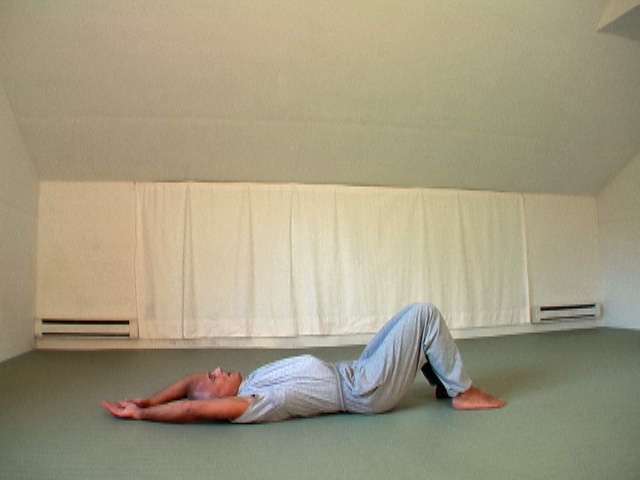
Thoracic spine mobility test–supine arm flexion
Keep your feet flat on the floor, buttocks firmly on the floor. Don’t arch your lower back. Keep your arms straight, with elbows locked, and lower them to the floor behind your head. If you touch the floor with your wrists, your back bridge will be fine. If you can’t touch the floor with your wrists, you will need to improve your thoracic spine’s mobility–otherwise your shoulders will suffer. A short set of exercises for improving thoracic spine’s mobility is shown on the Flexibility Express DVD in the chapter “Thoracic Spine Mobilization.”
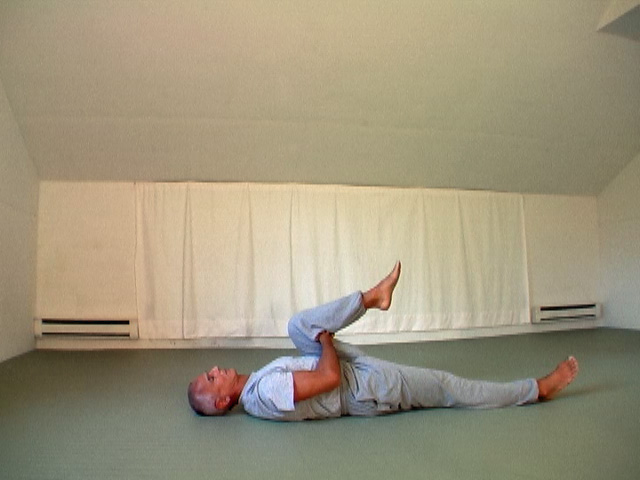
Iliopsoas length test–Thomas test
To make sure the muscles pulling your thighs forward are not too tight for the back bridge, do this hip flexor test, also called the Thomas test:
Lie on your back, press your lower back to the mat, and pull one leg, with its knee flexed, toward your chest. Keep your back flat on the mat. If the thigh of the other leg, left lying on the mat, is lifted by this movement before the angle between your thighs reaches 120 degrees, your hip flexors, specifically iliopsoas, are too tight.
If you have passed both the thoracic mobility test and iliopsoas length test, you have proved to yourself that your shoulders, spine, and hips have the range of motion needed for a back bridge. You have also proved that the muscles of your arms, trunk, and legs are already long enough for a back bridge. If you follow the exercise program taught on the Flexibility Express DVD, you will be able to bend or drop back into the bridge any time, without any warm-up!
If in the thoracic spine mobility test you can’t touch the floor with your wrists, you will need to improve your thoracic spine’s mobility with a short set of exercises presented on the Flexibility Express DVD in the chapter on thoracic spine mobilization.
If the hip flexors length test revealed tightness of your iliopsoas, then performing lying leg raises, at gradually increasing range of motion, should remedy it. Leg raises, which are taught on the Flexibility Express DVD, develop the strength you need to kick with great power as well as for the intensive stretching exercises that lead to front splits and back bridges.
This article is based on the book Stretching Scientifically and the video Flexibility Express. Get them now and have all of the info—not just the crumbs!